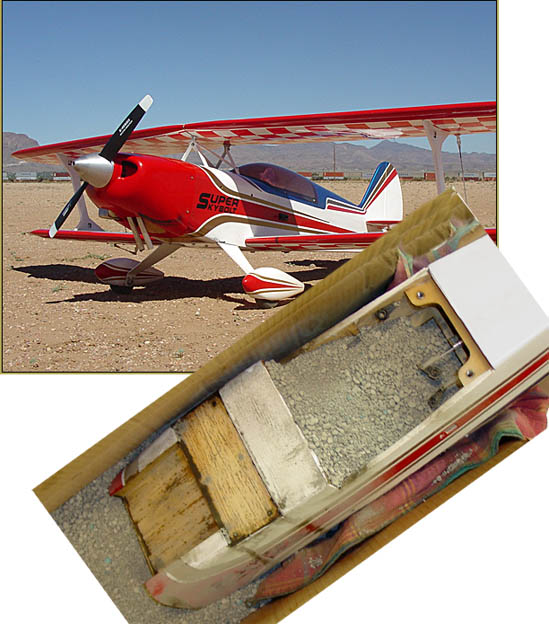
Sunday morning, I was flying my beautiful Great Planes Super Skybolt… tossing it all over the sky. Comes time to clean-up and go home, I find the insides of the model are drenched with glow fuel!
I mean drenched! … the woodwork was wet… the servos were wet… wires… battery… wet!
The fuel tank was split!
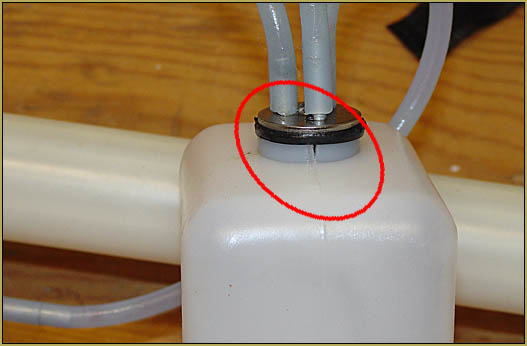
I first flew this model back in 2006… mighty nice of the tank to wait for twelve years before splitting! Actually, a few weeks, ago, I did notice a fuel leak, and, at that time, I saw that the stopper was a bit loose, and I tightened it down (too much?) to stop the leak… if it was already split, I didn’t see it.. The tank split at the neck, there… and I can only imagine the fuel squirting-out under pressure, drenching the insides of my model as I flew that model all over the sky like a madman last Sunday!
Kitty litter… CLAY kitty litter!
I did what I know to do… I bought some clay kitty litter (the “clay” kind, not the “clumping” kind) and packed the fuselage with that litter! The clay litter soaks-up the fuel and the oils that are soaking into the wood; leaving the wood “dry”.
A few years ago I had to do this operation to my Kadet Senior. A fuel leak at the tank cap got the floor of the forward section of the Kadet’s fuselage wet… and the battery, located up against the firewall, below the fuel tank, was wet, too. I was more careful at that time than I was THIS time as I poured-in the litter… left it there for a week, and then poured it out and cleaned things up.
Re-ARF the Skybolt!
I had to disassemble the model before I poured-in the litter. I removed all of the electrical stuff… the receiver, battery, servos, and the on/off switch unit. Then I removed the engine. It was easy enough to pull the engine; after I had removed the propeller and the fiberglass cowl, all four motor mount bolts on the firewall were easy to reach… and so I unbolted the mounts and lifted-out the whole motor-and-mount assembly as a unit. The servo arms, unscrewed from the servos, were still hanging on their control rods… and I just let them hang so they’d already be in the right place when I reassembled the model. I removed the landing gear so as to make the fuselage easier to handle.
See all that “golden” wood… wet with fuel!
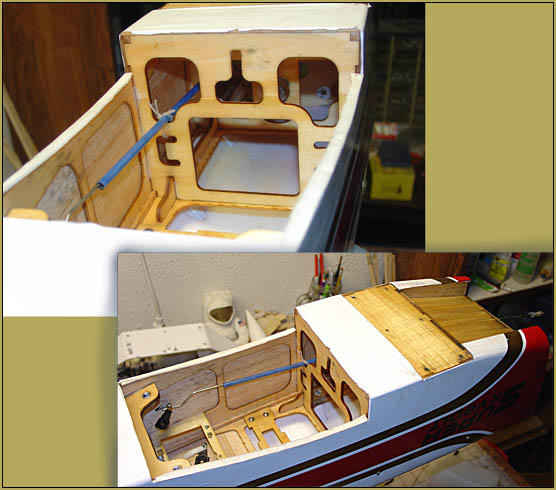
I filled that beautiful fuselage with kitty litter!
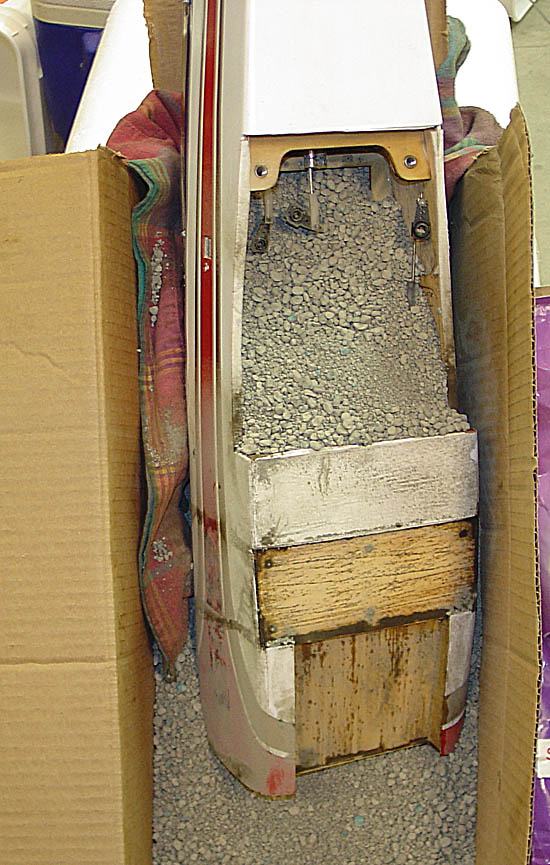
Be sure to use CLAY kitty litter!
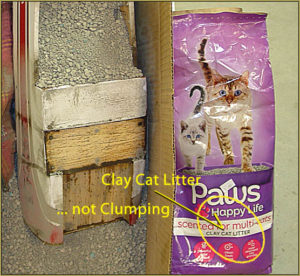 I covered the “glass” cockpit with a rag, stuck the fuselage into an appropriately sized carton… and started pouring-in the litter. I know I went overboard… THAT’S A LOT of litter… but I wanted to catch the firewall, inside and out… and I wanted to FILL the fuselage ahead of the trailing edge of the wing… and that firewall has a large hole in it (which I didn’t plug) for the fuel lines… so the litter poured right through that hole… ANYWAY… success.
I tapped on the fuselage to resettle the crumbs into the cracks every few hours, whenever I though about it, for a day, or two… then I rolled the fuse over to resettle the litter into new corners… and then, Tuesday, about noon, I poured out all of that litter… I shook the model so as to get all the crumbs out… I fired-up my compressor to 100 psi and blew off the loose stuff and cleared the screw-holes for the motor mount and landing gear. I toothbrushed the loose bits wherever I could reach and dusted everything everywhere.
Then I reassembled all… taking a little time with the hot covering iron to set down a few loose edges in the covering. I straightened the slightly-tweaked aluminum landing gear in the vise. It’s all back together… no parts left over… looking good!
I will be out there flying this thing on Wednesday morning…
See you there!

Hello – Sorry to hear about the Skybolt fuel tank splitting. I just bought a partially built Sky bolt arf, and wanted to replace the fuel tank from the get-go. What tank did you replace the OEM tank with? Hayes, Sullivan, DuBro?
Also, I’m considering using an OS Surpass II or the newer OS 95V. Any thoughts or opinions?
Cheers from Texas,
Tim
Hey, thanks for saying hello! … I used a Dubro tank that I had lying around… nothing special, it fit right into place. I am flying that Skybolt with an old Tower .75 and a 12-8 APC prop (well, OK… I am trying a 13-7 this week… but I think I liked the 12-8 better). I bought the ARF in 2006… been flying it off and on since then… about TIME the tank split! I had sort of put it aside for the last few years… and then I just went 2.4Ghz (set aside the FM transmitter) this year and that Futaba T8J radio has added new life and enjoyment to this old model. It flies better than I do… it has much to teach me. Weighs about 8-pounds and lands “hot”… but fun to fly and that 75 is plenty of power.
Tim… another thought: The firewall on that ARF is not structurally sound. A quick Google search will show you plenty of instances of loose and broken firewalls. It’s just a piece of lite-ply glued to the front of the tube that is the model’s fuselage…. and you bolt the motor-mount to that fragile wall. Mine lasted for years… but earlier this year I found the top part of the firewall had separated from the fuselage. So, before you fly yours, you will want to drip plenty of CA around the inside edges that you can reach. Maybe some epoxy?… again, it’s hard to reach anything down in there… but, whatever you can do will keep your model together for a longer time. … On MY broken model, with the motor still mounted to the firewall, I pried the gap open as wide as I dared and then drenched all of the edges with thick/slow CA… and then squeezed everything closed, as tight as I could get it… waited a few minutes and then sprayed some Kicker on the outside seams… and then I drizzled regular medium CA onto all that I could reach on the inside of the nose of the model. waited a bit… and again hit it with kicker. Then, after a couple of hours, I picked up the fuselage, holding it only by the engine, and waved it around the room until I was satisfied that my glue-job, my firewall, was strong.
Great flying model… best of luck with yours!
Thanks for the great info!
Yes, I read about the firewall problem and will address that when I get there. I will likely drip CA or epoxy from the hole where the fuel tank goes. Ideally, I would like to fuel proof everything, but I don’t think it’s reachable. Life is keeping me from working much on this.
Can you tell me what Dubro size tank you used? Was it the like the ones you can buy new off their website?
I built a Great Planes Reactor Bipe 60 last summer and am now super paranoid I over tightened the tank bung, but would have to break a former out, as the Reactor tank gets fixed into place, as opposed to the Skybolt which is rubber banded into the Fuse.